Steps to install MONAI label and activate the server
Installation requirements

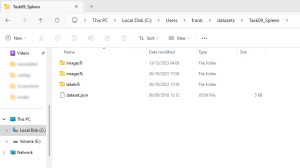
MONAI label can be installed through three methods: from PyPI, GitHub, and DockerHub.
PyPI (Python Package Index), is an online repository for sharing and distributing Python software packages, allowing developers to easily publish, discover, and install Python libraries and modules using the pip tool. We have installed MONAI label from PyPI, using the following steps.
1) Install Anaconda
Anaconda is an open-source software that makes it easier for people to work with Python, especially in the fields of data science, machine learning, and scientific computing. It includes a helpful program called Conda, which makes it simple to install and organize different software packages. It can be downloaded at https://www.anaconda.com/download.
2) Open the Anaconda Prompt
a) After starting the Anaconda prompt, create a new virtual environment named "monailabel-env" with Python.
conda create -n monailabel-env python= xx
xx= your Python version, e.g. 3.9
b) Update the Python packages pip, setuptools, and wheel to the latest available version
python -m pip install --upgrade pip setuptools wheel
c) Install the latest stable version for Pytorch
pip install torch torchvision torchaudio --extra-index-url https://download.pytorch.org/whl/cuxxx
cuxxx= your CUDA version, e.g. cu121
d) Check if CUDA enabled
python -c "import torch; print(torch.cuda.is_available())"
It will return "True" if your Python environment supports GPU acceleration through PyTorch and you have an available GPU, otherwise "False"
3) Install MONAI label
Activate the virtual environment and install it:
conda activate monailabel-env
pip install monailabel
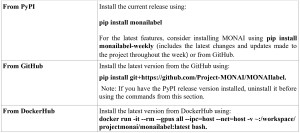
4) Download apps
Download and install the radiology app type:
monailabel apps --download --name radiology --output apps
Now let's download and install the Bundle app to the same folder we downloaded the radiology app:
monailabel apps --download --name monaibundle --output apps
Please note: To date, to enable the functionality of the bundle app and use MONAI zoo models, it is required to install version 1.2.0 of MONAI. If a different version is installed, it will first be necessary to uninstall it using the command:
pip uninstall monai
Subsequently, one can proceed with the installation of version 1.2.0 using the command:
pip install monai==1.2.0
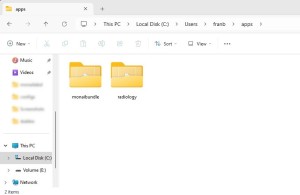
5) Download datasets
Typing "monailabel datasets" in the anaconda prompt one can see all datasets available as part of the medical segmentation decathlon.

The Medical Segmentation Decathlon represents an international biomedical image analysis challenge in which algorithms for medical image segmentation compete in a multitude of both tasks and modalities (http://medicaldecathlon.com/) [2]. The competition involved ten distinct datasets, each presenting unique and challenging characteristics.
To download the datasets, use the following command:
monailabel datasets --download --name xxx --output datasets
xxx: the name of the dataset, e.g. Task01_BrainTumour
The datasets are downloaded in a corresponding folder, located at Local Disk (C:)/Users/(User name)/datasets. In this folder, one can view and organize all the datasets. Please note that the format used for images is the compressed NIFTI (.nii.gz).
6) Activate the server
monailabel start_server --app apps/xxx1 --studies datasets/xxx2/imagesTr --conf models xxx3
Through this command, it can be chosen to load:
xxx1: the app "radiology" or "monaibundle"
xxx2: the dataset on which is going to work (e.g. type "Task10_Colon").
xxx3: the model one intends to use (type for example “deepedit or "segmentation_spleen”. One can load all models simply by typing “all”.
7) Install 3D-Slicer and MONAI label in the extensions manager
a) Download 3D-Slicer at https://www.slicer.org/ and install it.
b) Install Monailabel in the extensions manager of 3D-Slicer

8) Start using 3D-Slicer and MONAI label
Launch 3D-Slicer and navigate to Modules > Active Learning to access the MONAI Label module.
After loading the server, the MONAI Label module provides the following information:
In the top panel:
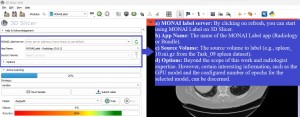
In the bottom panel:
9) Start using the Radiology and Bundle apps
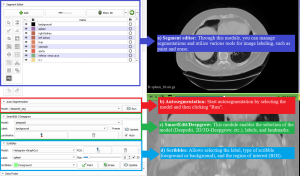
Radiology app
Following the steps above, it is possible to start the segmentation using interactive approaches or autosegmentation. Below, we will show in more detail how to perform segmentation using Deepgrow, Deepedit, and Scribbles.


Bundle app
By launching the bundle app, one can utilize the models available on MONAI model Zoo website.


10) Submit the labels
After completing the segmentation, it is necessary to submit the labeled data, after which the training can start. Moreover, it is possible to proceed to the next sample even while the training is ongoing.

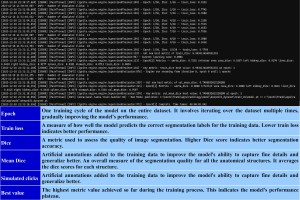
11) Train
Throughout the training process, observing the events occurring in the anaconda prompt and within the active learning module of 3D-Slicer is interesting. In the terminal, it's possible to assess the model metrics, while in 3D-Slicer, one can monitor the progress of status and accuracy bars.

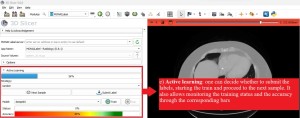
Active learning
MONAI label employs Active Learning to choose the most relevant data for model training. A radiologist labels a volume and incorporates it into the training pool. Subsequently, a machine learning model undergoes training with the updated annotation, resulting in the generation of a new model. This model facilitates uncertainty estimation, which is then employed to prioritize the unlabeled volumes, selecting a subset of the most uncertain ones. The identified uncertain data is then labeled by the radiologist and added to the training pool. This cycle can be repeated multiple times until a model with the desired performance is obtained [2, 5].
